HTML
5 and CSS3 offers new features in ‘Fonts’, these features are lot more
effective comparing to the existing CSS2 ‘fonts’ properties. Lets have
an in-depth look at it.
One of the major property/feature in CSS3 is using Custom fonts in websites.
Using
custom fonts were restricted in CSS2 and were limited to some fonts
such as ‘Arial’,’TimeNewRoman’,’Verdana’ etc... therefore we had to use
javascript/jquery as an alternative solution. There came the time to
take a deep breath for web-developers, Yes! W3C (World Wide Web
Consortium) came up with their update in CSS as CSS3 which was a remedy
for using Custom fonts too.
There are two ways of using Custom fonts
Using our own fonts
Using google webfonts (this has a wide range of fontstyles)
These two works in all browsers Firefox, Chrome, Safari, Opera, IE5+
Using our own fonts
Upload the font file(s) you want to use to the(your) server.
CSS3
can renders several font formats: “truetype” (ttf), “opentype” (otf),
“embedded-opentype” (eot) and “scalable-vector-graphic” (svg,svgz).
IE versions use .eot font type
In
order to use a font, we must first call it using the ‘@font-face’
attribute and this must be done for each individual font we wish to use.
See the below sample code
/*Note : This is the way you declare and make the font to your site */
Sadly :( this feature doesn’t support propperly in any of the major browsers
3. Another useful feature is ‘Font-size-adjust’
Which allows you to specify an aspect ratio for your text when font fallback.
What is it ? You give a font-family to your element such as font-family : ‘Trebuchet MS’,’Times new roman’,’Georgia
Which means go for ’‘Trebuchet MS’ initially if font is not available go for ’Times new roman’ and so on,
So
just in-case if the first font is not available it loads the second one
, this sometime causes to break the styles/ neatness of your site,
because aspect value (x-height) in each font type differs so
To avoid and overcome this issue CSS3 has come with a cool property ‘font-size-adjust’
this allows you to use the same aspect values when a font is fallback
IMO Absolutely this module should be named as one of the core module in Drupal, This is the feature that we all (Drupal developers) were expecting when we were struggling to get the site 'live' from 'staging' or 'staging' from'development'. So here the most anticipated feature of Drupal developers.
What the module does ?
In a nutshell this module allows you to Import and Export Content types,Views,CCK Fields, Permissions, Roles, Menus etc... from one drupal site to another.
After you enable the module you could see the 'Fetures' tab in 'Site Building ' menu or you can directly redirect to /admin/build/features
Once you click on that tab or go to the admin/build/features link you might get into the features configurations page with two tabs
Manage
Create feature
Click on 'Create feature'
Note : all the features that your going to create is going to be a separate module/ will export a different module.(you can get a clear picture of what I mean in the end of this chapter)
In the 'Name' field give an appropriate name for your feature.
Then a 'Description'
Then the 'Version' such as 6.x-1.0, 6.x-1.0-beta1
(This is the normal structure of a module you write in the .info file See module development )
Leave the "URL of update XML" field for now
In the "Edit components" dropdown list, select the component that you want to export eg: Views
Once 'Views' is selected it will give you a list of the views that you've created in /admin/build/views
Select the view you want to export (you can select multiple views)
If all set, then hit the 'Download feature' button and export your view(it will download as a zipped/tar/rar file as you download a module)
Now your done with exporting your view.
Note 2: Hope you understood why I said 'its a module' in the previous note
Yipppi!!! we exported our view, and next is to import it to the other Drupal site where we need the same view.
Go to the other site and make sure the 'Features' module is Installed and enabled
Now untar the feature you downloaded and then upload it to your /sites/all/modules/ folder via FTP
Then click the 'Features' configuration page in the 'Site Building' menu or go to admin/build/features
Click on 'Manage'
You'll find the feature that you uploaded in the manage page.
Simply check the chekcbox and enable the feature.
Hurrraaaay!!! the component you exported would be available for in your new site too
eg: If you have exported a view and uploaded in the other site, the view would have been created in your site by enabling it, you can still check it in /admin/build/views .
Part 1 Introduction This
is an area which covers to add ‘Custom markers’ or ‘Multiple Custom
markers’ to yourGeo map. This chapter assumes that you have a fair
understanding about the Part1 which is in the above link.
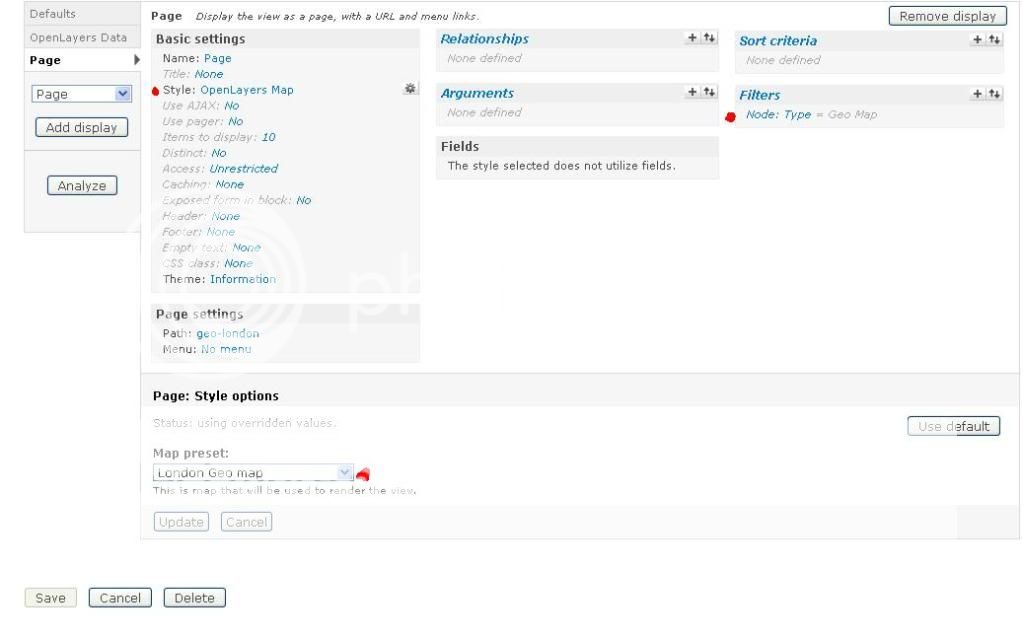
Now your map is created and then you see the default marker (ornage/blue ring) sticked in the Address you added.
now we need to change the marker
Step by Step
Site building --> Openlayers-->Styles or /admin/build/openlayers/styles
All the markers will be listed, Clone the ‘Default style’ marker.
Fill all the fields with your new markers name and description
Under Style Properties and Plugins--> externalGraphic give the URL of your marker
then to define the size of the marker size click on pointRadius and adjust then adjust the numeric value in textbox
Save the Style;
Your marker will be displayed in the list
Now you need to select the custom marker for your map
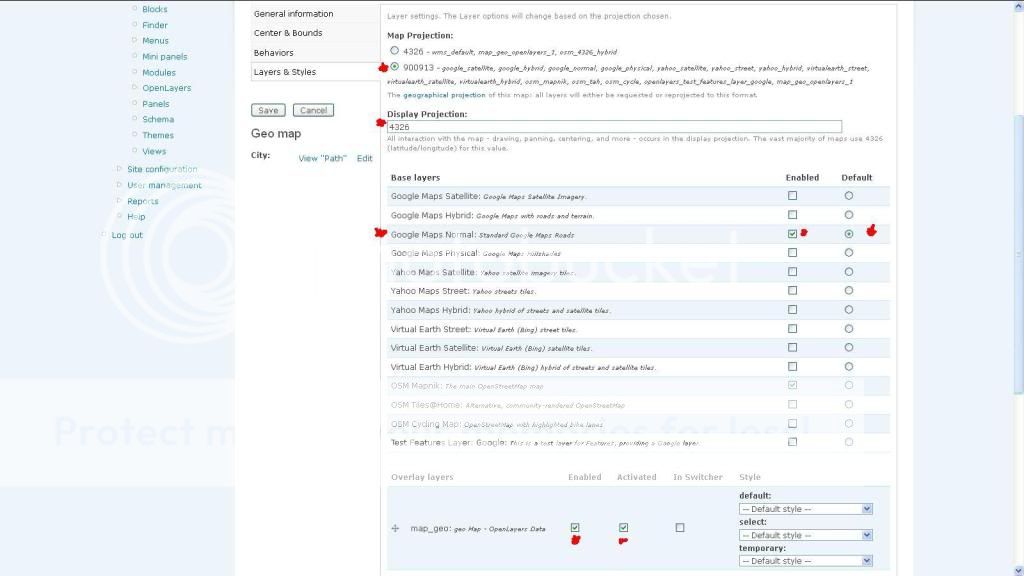
Go-to the Preset you’ve created already
Select Layers & Styles tab
Scroll down to see your ‘View’ you’ve activated and enabled in ‘Overlay layers’
Select the marker/ style you created from the dropdown list in ‘Style’ column
Select in all three Dropdown list
And hit Save.
Refresh your map-page and you’ll get your newly created markers